This article only relates to n8n instances that are installed with Docker.
What is this Article About?
When using n8n, there may come a time where you have to use a function in a code node that requires the use of a Node.js module – for example crypto or express. You will see this in your function where you see something like:
const crypto = require(‘crypto’);
When you run your function, you may find that it throws an error when you test the node. That error may look like this:
cannnot find module ‘crypto’ [line 1]
VMError
If you see this, it means one of a few different things:
- You have the right modules installed, but your configuration is not allowing it
- You have the right configuration, but the module is not installed
- Both of the above.
What are Node.js Modules?
Modules are additional functionality that can be imported using the require function. For instance, the http module can be imported to create a web server, while a custom module can be imported to access specific business logic. Modules can export functions, objects, or classes, allowing the importing file to utilise their functionalities.
Node.js modules are used extensively in both small-scale and large-scale applications to streamline development. For example, developers can use the express module to simplify building web servers or the moment module for handling dates and times.
This modular architecture enables code reusability, reduces redundancy, and fosters a collaborative development ecosystem through npm.
Whether building APIs, managing databases, or performing complex computations, Node.js modules provide the tools needed to build efficient and scalable applications.
Node.js Modules and n8n
n8n has a number of these modules already installed, but the setting to use them is not activated out of the box. Where they are not installed, you can install them and use them in your workflow.
Modules that are already builtin are:
- _http_agent
- _http_client
- _http_common
- _http_incoming
- _http_outgoing
- _http_server
- _stream_duplex
- _stream_passthrough
- _stream_readable
- _stream_transform
- _stream_wrap
- _stream_writable
- _tls_common
- _tls_wrap
- assert
- assert/strict
- async_hooks
- buffer
- child_process
- cluster
- console
- constants
- crypto
- dgram
- diagnostics_channel
- dns
- dns/promises
- domain
- events
- fs
- fs/promises
- http
- http2
- https
- inspector
- inspector/promises
- module
- net
- os
- path
- path/posix
- path/win32
- perf_hooks
- process
- punycode
- querystring
- readline
- readline/promises
- repl
- stream
- stream/consumers
- stream/promises
- stream/web
- string_decoder
- sys
- timers
- timers/promises
- tls
- trace_events
- tty
- url
- util
- util/types
- v8
- vm
- wasi
- worker_threads
- zlib
If the module you would like to use is not in then above list, you will need to use the external installation process.
Using Built-in Modules
If the module you require is in the list above, you can use this with your existing n8n instance set up. Please remember, this guide only applies to installations with Docker where the article to install this was followed.
The first step to use your module is to allow the use of the modules. This is done by making a change to one of the configuration files called the docker-compose.yml file.
We need to edit this file.
Mode to the directory where the file is located:
cd /home/n8n-docker-caddyThen, use a text editor to open the file:
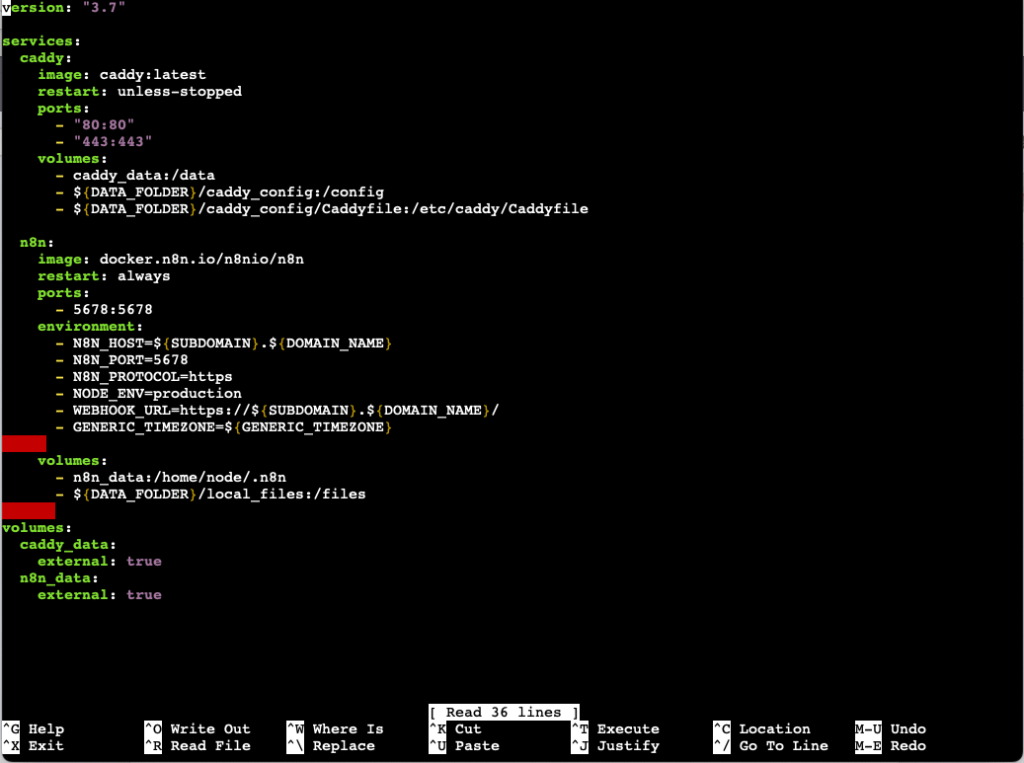
nano docker-compose.ymlInside of this file, you are looking for the environment section. You will see a number of things in there already. Your file should look like this:

Under the environment section, we need add an additional line. Use the arrows on your keyboard to move the last line of the environment section, press enter to create a new line, use the spacebar to move the curser inline with the – above and paste in ONE of the following:
Single or a Handful of Modules
If you want to only activate one or two of the modules, use the following:
- NODE_FUNCTION_ALLOW_BUILTIN=<comma-separated-module-names>So if you wanted to use the crypto module, you would use:
- NODE_FUNCTION_ALLOW_BUILTIN=cryptoIf you wanted to use crypto and http, then use:
- NODE_FUNCTION_ALLOW_BUILTIN=crypto,httpYou can add as many as you like to that comma separated list.
Activate All Modules
If you wanted to make all of the modules available, use:
- NODE_FUNCTION_ALLOW_BUILTIN=*It is best practice to only activate the ones you need.
Once you are happy, close the text editor by using ctrl and X on your keyboard. Y to the yes or no question and Enter to save the file.
Then, run the following commands to bring down Docker and then bring it back up.
docker compose downdocker compose up -dGive it a few seconds and try your workflow again and you should find the error has gone.
If you want to add more modules in future, add them to the comma separated list in your docker-compose.yml file and repeat the 2 steps above.
Using External Modules
If your module is not in the list, the process for using them is slightly different. we need to active and install the module and then use it in the workflow.
To make this work, we need to use what is called a custom image. That sounds complex and, if it sounds techie, fear not! The actions are just as simple as copying the commands, but it will mean that the way you update n8n is slightly different too.
First, we need to create something called a Dockerfile and this MUST go in the same file as our docker-compose.yml file.
If you followed our installation guide, then these instructions apply to that. If not, you will need to find your docker-compose.yml file and adjust the paths below.
Move to the directory where your docker-compose.yml file is located:
cd /home/n8n-docker-caddyThe, use a text editor to create the Dockerfile
nano DockerfileIn this example, I’m going to install a module called express. Add the following to the file. If you already have this, you may just need to add the part related to installing the npm module.
FROM n8nio/n8n:latest
USER root
RUN npm install -g express
USER node
Where you see express above, that is the name of the module. Change this to the module name you are installing. If there is more than one, add them all separated by a space i.e. express module2 module 3
Once you are happy, close the text editor by using ctrl and X on your keyboard. Y to the yes or no question and Enter to save the file.
Next, we need to make a change to the docker-compose.yml file:
nano docker-compose.ymlUnder the n8n section, we need to make a change to one part of this. We need to delete out image: docker.n8n.io/n8nio/n8n and replace this with:
build: .Under the environment section, we need add an additional line. Use the arrows on your keyboard to move the last line of the environment section, press enter to create a new line, use the spacebar to move the curser inline with the – above and paste in ONE of the following:
Single or a Handful of External Modules
If you are only activating one or two modules, add the following:
- NODE_FUNCTION_ALLOW_EXTERNAL=<comma-separated-module-names>So, if I only wanted to activate express, this would be:
- NODE_FUNCTION_ALLOW_EXTERNAL=expressIf I wanted to active more than one:
- NODE_FUNCTION_ALLOW_EXTERNAL=express,module2,module3Allow All External Modules
If you wanted to allow all external modules, use:
- NODE_FUNCTION_ALLOW_EXTERNAL=*It’s best practice to only allow the ones you want to use.
Once you are happy, close the text editor by using ctrl and X on your keyboard. Y to the yes or no question and Enter to save the file.
Now, we need to make all of this work. Run the following commands:
Bring Bring Docker Down
docker compose downThen, build the new image:
docker compose buildThen bring Docker back up
docker compose up -dWait a few seconds and you should find you can use your installed modules.
If you want to add more modules in future, add them to the Dockerfile and docker-compose.yml file and repeat the 3 steps above.
Updating n8n with External Modules
If you have used any external modules, the way you update n8n will change. Rather than following the update guide, you will need to use the 3 steps at the end of the last process. So, when an update is available, use:
docker compose downdocker compose builddocker compose up -dThis will update n8n to the latest version. If you are only using build-in modules, you can follow the normal update instructions.

