This guide is only applicable if you install or have installed n8n using Docker.
About This Article
n8n, like any other software installed on a server and accessed via a browser, requires a web server to deliver the pages to the browser. In the case of n8n, it uses software called Caddy.
If you only use your current server for n8n and no other application, you can happily leave this as it is and everything will work perfectly.
You may run into some issues if you want to install other applications on your server alongside n8n, and they need a web server. That’s because Caddy may not be compatible with your new application or must be configured to work with it.
Caddy is a great web server, so if you can configure Caddy to work with your new application, that might be the way to go.
Many applications that you may use will recommend you either use Apache or NGINX – these are 2 of the more popular web servers and, if it is the case you need to use one of these, NGINX tends to be the higher performing and essentially easier to configure (just a personal opinion).
This article looks at configuring n8n to work with NGINX rather than Caddy.
Install NGINX
The first stage of this process is to install NGINX. If you have this installed already, you can skip to the next section.
Firstly, update your server:
sudo apt updateThen install NGINX:
sudo apt install nginx -yCreate a Configuration File
Next, we need to create a configuration file for NGINX and n8n.
Create the configuration file:
sudo nano /etc/nginx/sites-available/n8nThen add the following to the configuration file. Replace <your-domain> with the domain n8n is currently installed at without http:// or https://. If you used any other port that 5678 to install n8n, then change 5678 to the correct port too
server {
    listen 80;
    server_name <your-domain>;

    location / {
    proxy_pass http://127.0.0.1:5678;
    proxy_set_header Connection 'Upgrade';
    proxy_set_header Upgrade $http_upgrade;
    proxy_http_version 1.1;
  }

    location /webhook/ {
        proxy_pass http://localhost:5678;
        proxy_set_header Host $host;
        proxy_set_header X-Real-IP $remote_addr;
        proxy_set_header X-Forwarded-For $proxy_add_x_forwarded_for;
        proxy_set_header X-Forwarded-Proto $scheme;
    }

    location /webhook-test/ {
        proxy_pass http://localhost:5678;
        proxy_set_header Host $host;
        proxy_set_header X-Real-IP $remote_addr;
        proxy_set_header X-Forwarded-For $proxy_add_x_forwarded_for;
        proxy_set_header X-Forwarded-Proto $scheme;
    }

    # Error Pages
    error_page 500 502 503 504 /50x.html;
    location = /50x.html {
        root /usr/share/nginx/html;
    }
}
Save and exit the file (ctrl + x, Y to save the modified buffer and Enter to save the file)
We then need to create a symlink to the new file:
sudo ln -s /etc/nginx/sites-available/n8n /etc/nginx/sites-enabled/Then test NGINX to make sure everything is OK:
sudo nginx -tConfigure n8n to Work With NGINX
To make n8n work with NGINX, we need to make some changes to the docker-compose.yml file. If you followed our guide on how to install n8n with Docker, these commands will work for you. If you installed with Docker but followed another guide, you will need to find where your docker-compose.yml file is and move to that directory:
Move to the directory where the docker compose file sits:
cd /home/n8n-docker-caddyThen open the docker-compose file to edit it:
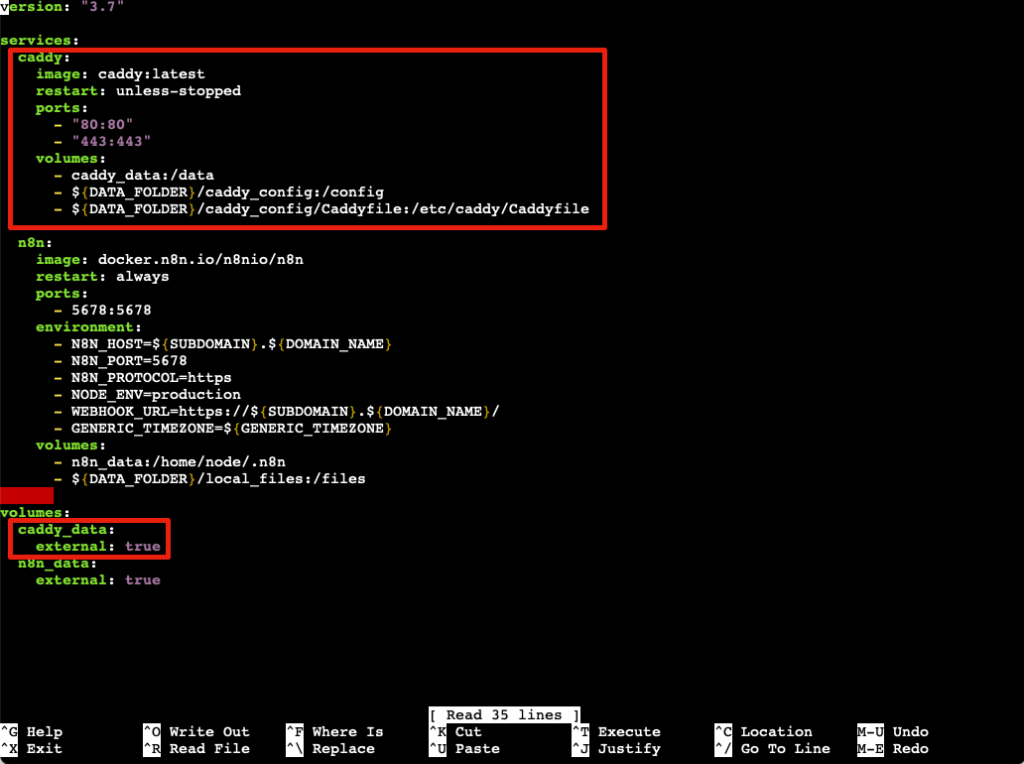
nano docker-compose.ymlWe need to remove the entire caddy block from this file and the reference to Caddy Data. Delete the parts you see in the red boxes in the image below:

OK, now we need to stop and remove Caddy.
WARNING: Only do this if you are 100% certain that no other services or applications are using Caddy.
Run this command to identify the Caddy container ID:
docker ps --filter "publish=80"This will return something like the image below. Make a note of the container ID. The one in the example is in the red square. You need to capture whatever yours is:

Then, run these commands to stop and remove the container Replace <caddy-container-id> with the container ID you copied:
docker stop <caddy-container-id>docker rm <caddy-container-id>Now, we need to restart NGINX in order for it to bind to the correct ports. Run:
systemctl restart nginxFinally, stop and restart Docker:
docker-compose down && docker-compose up -dInstall an SSL for Your Domain
We then move onto obtaining an SSL for your domain to work inside of NGINX. This will fail if you haven’t pointed the domain to your IP address.
Install Certbot:
sudo apt install certbot python3-certbot-nginx -yThen request the certificate. Replace <your-domain> with your full domain name without http:// or https://:
sudo certbot --nginx -d <your-domain>Follow the prompts to install the certificate.
Now, access n8n from the browser and you should see it as you did previously. If there are any errors or it won’t load, revisit each step to be sure everythinh was completed.
Wrapping Up
That should be all you need to do to run n8n behing NGINX. A few things to test:
Run the following command to stop NGINX:
systemctl stop nginxThen try and access n8n in the browser. If you can no longer see your n8n instance, it means it is now being served via NGINX.
Run the following to restart:
systemctl start nginxCheck one of your existing workflows or create new one and send data to the test url to make sure everything is receiving OK.
If that’s all OK, then you are good to go.

